How To Generate Terrain With Matrices And Calculation Cells?
First of all if we try to define what a matrice is, we can say that it is a two-dimensional number table. For example:
[5] is a one-dimensional number with one number,
[5 2] is a two-dimensional number table with a size of 1x2. Same way;
|5 2|
|4 7| is also a two-dimensional number table with a size of 2x2.
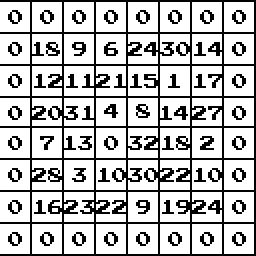
While creating terrains, first of all we will create a matrice but way more larger than the ones in the examples, maybe some 256x256 sized-ones. But to make it easier to understand I will explain everything with a 8x8 matrice. So think about a 8x8 matrice of which all numbers are zero.


For the next step, we will assign random numbers from a limited interval for each component of this matrice. I will use [0,32] interval. I want to create an island, therefore I will assign numbers only to the red area I've shown above, and leave the ones on the outside as zero. After assigning numbers, I will be something like this:
The next step is using canculation cells. Canculation cell is a function that applies a specific operation over a specific area of any matrice. For this example I will use a 3x3 sized calculation cell, which will add up all the numbers in a 3x3 area and assign the total number to the component in the middle of the calculation cell. This calculation cell will be applied all over our matrice to generate a new matrice of higher numbers.
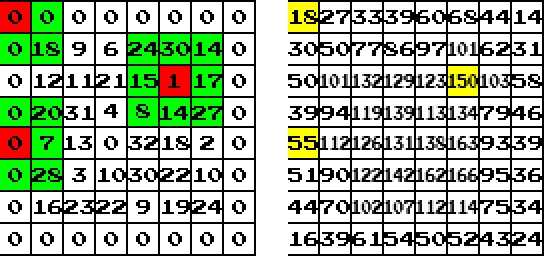
Above on the left, the green areas with red midpoint are our calculation cells. As you see for the cells on the corners, most of the numbers left outside. For the ones on the sides, most of the numbers are inside the matrice. And for the middle ones all of the numbers are in the cell. And above on the right is our second matrice that is generated after the calculation cell operations are finished. You must note that the one on the right and the first matrice we created are TOTALLY DIFFERENT. That means you must create a second matrice for the results of calculation cells. If you record the results of the calculation cells on the source matrice, that will give a problematic terrain generation.
But How Did It Work?
Let us take a look at the calculation cell on the top-left corner. What our calculation cell does is adding up all the numbers inside itself, and then assigning the total number at the midpoint of the result matrice. So, the top-left cell added up 0+0+0+18 = 18, and assigned it to the red component of the result matrice, which can be seen as an 18 in a yellow box on the right matrice.
For the one at the left side: 0+20+0+7+0+28 = 55' is total number and 55 is added to the midpoint.
And fot the middle cell: 24+30+14+15+1+17+8+14+27=150, which can also be seen on the right as assigned to the midpoint.
This operation will be done for each component in the matrice, which means for a 8x8 matrice, calculation will be done 64 times..
How Do We Generate Terrain From This Matrice?
We will use the same logic as the one in Perlin method. We will define a sea level, for example 90, and assign every component below this as sea, above this as land. For our 8x8 matrice, I applied a color scale as follows and achieved the result:
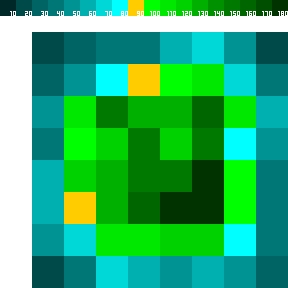
I know it doesn't look beautiful. This is because a 8x8 matrice gives a really low resolution. As out matrice gets larger (for example a 225x255 sized matrice), the resolution gets larger and we get better terrains. I generated a contour map for our matrice and this way enhanced the resolution 16 times:

Applying This Method To Game Maker
In Game Maker, we use GRID's instead of matrices. For the calculation cell operations, we will use ds_grid_get_mean command and define a "cell range" variable.
For the first step we generate a sprite and an object, which we will use as "empty space". The color of the sprite doesn't matter, however it is better to make it square. I used a 16x16 white sprite and named my object as empty.
Now create a new script and name it as terraingen. Now we will assign some variables in the beginning to make it easier to change later. These are my variables:
nrange = 32; //upper boundary of the random numbers.
range = 5; //range of the calculation cell.
srange = 9; //range of the second level calculation cell*
border = 3; //the thickness of the area that will be left as zero (for island-like generations)
tilesize = 16; //size of our tiles, which is same as sprite size.
*You don't have to create a secondary calculation cell here, however the more you use calculation cells, the better your terrain becomes.
Now create three grids (the actual number is n+1, where n is your calculation cell number, I have 2 cells, therefore I created 3 grids). The first one is our randomly generated source matrice, the second one is our result matrice for first calculation cell operations, and the third one is our result matrice for secondary calcualtion operations.
global.grid1 = ds_grid_create(room_width/tilesize,room_height/tilesize);
global.grid2 = ds_grid_create(room_width/tilesize,room_height/tilesize);
global.grid3 = ds_grid_create(room_width/tilesize,room_height/tilesize);
This way we created three different grids of which sizes' depend on our empty object's sprite size.
After we filled our room with our empty object (see: Useful Code Groups) now we will assign random numbers to our matrice. With a "double for loop" we can do this operation:
for (i=border;i<room_width/tilesize-border;i+=1) //horizontal working for loop
{
for (j=border;j<room_height/tilesize-border;j+=1) //vertical working for loop
{
ds_grid_set(global.grid1,i,j,random(nrange)); //function that assigns random numbers
}
}
The code above: increases i and j variables one-by-one from (border, grid size - border) interval and does ds_grid_set operation for each (i,j) coordinate inside the grid. Here, ds_grid_set operation assigns a random number from (0,32) interval for (i,j) coordinates.
Now the next step is creating our calculation cell and making it work. We will create another double-for-loop, however this time our ds_grid_set function will write over our "second grid". And our function that calculation cells operate is ds_grid_get_mean.
for (i=0;i<room_width/tilesize;i+=1)
{
for (j=0;j<room_height/tilesize;j+=1)
{
ds_grid_set(global.grid2,i,j,ds_grid_get_mean(global.grid1,i-range,j-range,i+range,j+range));
}
}
The ds_grid_get_mean function does not work as same as the one in our 8x8 matrice example. This grid function adds up all the number in the area it works on, and then divides the total to the total component number inside the area, which actually means it calculates mean value. For example when our range is 2, that means we will move 2 cells further from the middle point in four direction. If (i,j) = (8,8), than the function will work as:
ds_grid_set(global.grid2,8,8,ds_grid_get_mean(global.grid1,6,6,10,10));
This function uses the following coordinates for the operation:
(6,6) (7,6) (8,6) (9,6) (10,6)
(6,7) (7,7) (8,7) (9,7) (10,7)
(6,8) (7,8) (8,8) (9,8) (10,8)
(6,9) (7,9) (8,9) (9,9) (10,9)
(6,10) (7,10) (8,10) (9,10) (10,10)
which actually is a 5x5 matrice. Since a 5x5 matrice conist of 25 components, the function divides the total number to 25 after adding all the given components up, and assign the result to the midpoint at grid2 which is (i,j) = (8,8)
Now we will do the exact same considering grid2 as our source and grid3 destination, while using srange as our new range.
for (i=0;i<room_width/tilesize;i+=1)
{
for (j=0;j<room_height/tilesize;j+=1)
{
ds_grid_set(global.grid3,i,j,10*ds_grid_get_mean(global.grid1,i-srange,j-srange,i+srange,j+srange));
}
}
As you see we multiplied the value by 10. We did this do decrease decimal values and make better calculations, so it is not essential.
After all these, we now creates our random matrice global.grid3 using calculation cells. All these calculations take only one or two seconds, which is really fast. The speed here depends on the number of multiple calculation cell operations and range values for each.
Now it comes to create a terrain from this grid. We will now open our empty object, add a create event, add Execute Code inside and write this inside the code:
alarm[0]=2;
We have to do this because we don't want the code we will write into the empty object to be executed before the grid operations end. If the code started immediately it would try to get data from the uncalculated cells of our grid, which would cause glitches. To avoid this, we make only 2 frame delay with alarm function.
Now we will add an Alarm event with Alam0 and add an Execute Code operation again. The code we will write here will do assignments depending on elevation which is actually our calculated grid3's values. The codes I used and explanations are as follows:
kolo = ds_grid_get(global.grid1,x/16,y/16); //reads data from grid3, assigns to a temporary variable
w=159; //sea upper limit
sa=160.5; //sand upper limit
gr=164; //grass upper limit
mo=167; //moutain upper limit
bmo=169; //high mountain upper limit
(kolo < w)
{instance_change(water1,true);} //if below sea limit, transform into water
if (kolo > w) and (kolo < sa)
{instance_change(sand,true);} //if between sea and sand limits, transform into sand
if (kolo > sa) and (kolo < gr)
{instance_change(grass,true);} //if between sand and grass limits, transform into grass
if (kolo > gr) and (kolo < mo)
{instance_change(mount,true);} //if between grass and mountain limits, transform into mountain
if (kolo > mo)
{instance_change(bigmount,true);} //if above mountain limits, transform into high mountain
Now let us create an empty room, for example a 3600x3600 sized one! And then make it run your terraingen script. You can create a new controller object and put into the room or just add into room's creation code. The room size should be proportional to the your tilesize variable to get better results. You can try different range and srange values to see how it differs. My results are as follows for three different variable couples.
range=5;srange=9;


No comments:
Post a Comment